
This homemade, gluten-free chicken pot pie recipe is perfect for those times when you’re wanting something yummy and comforting. It is also free from gluten and dairy. This recipe a healthy twist on the classic pot pie flavors you know and love and is great for batch cooking because it reheats so well. Just be sure to make extra because this will definitely be a new family favorite!

I love homemade chicken pot pie! It is one of the best recipes I make if I’m in the mood for comfort food, feel the cold of fall or winter set in, or even if I need a dish that will feed (and fill up) a large group.
I used to love those cheap pot pies, you know the ones, they’re in the frozen food section. The problem is that they are FULL of super junky ingredients (as most cheap food is). And while it’s been YEARS since I have eaten a frozen pot pie, I still missed them.
But nowadays, in addition to staying away from junk food because of the undesirable ingredients, I also have a few food intolerances so I have to tweak most recipes. After a few flat-out flops and some so-so pot pies, I finally found a way to make a healthy, homemade gluten-free chicken pot pie that has all of the joy of pot pies past without the unhealthy ingredients.
In fact, I think this pot pie recipe is a lot tastier than those frozen pot pies! Probably because real food is always more delicious 😉

How To Make Homemade Gluten-Free Chicken Pot Pie
A few quick tips:
To make this recipe quicker and easier you can dice and cook the chicken ahead of time (you can also shred the chicken after cooking if you prefer).
If you’re starting with raw chicken be sure to pan fry or bake your chicken all the way through before adding to your pot pie mix.
As far as veggies, you can use fresh, frozen, or canned. It’s really up to you. I prefer to use fresh or frozen but I know some people have canned veggies and they will work too.
This post may contain affiliate links, which means I’ll receive a commission if you purchase through my links, at no extra cost to you. Please read full disclosure for more information.
Ingredients
- Diced (or shredded) chicken, cooked through
- Mixed vegetables ( or carrots, peas, and corn separately)
- Yellow onion
- Chicken bone broth (store-bought or homemade)
- Milk of your choice
- Ghee or butter
- Garlic powder
- Gluten-free all-purpose flour
- Poultry seasoning
- Arrowroot powder
- Salt
- Pepper
Instructions
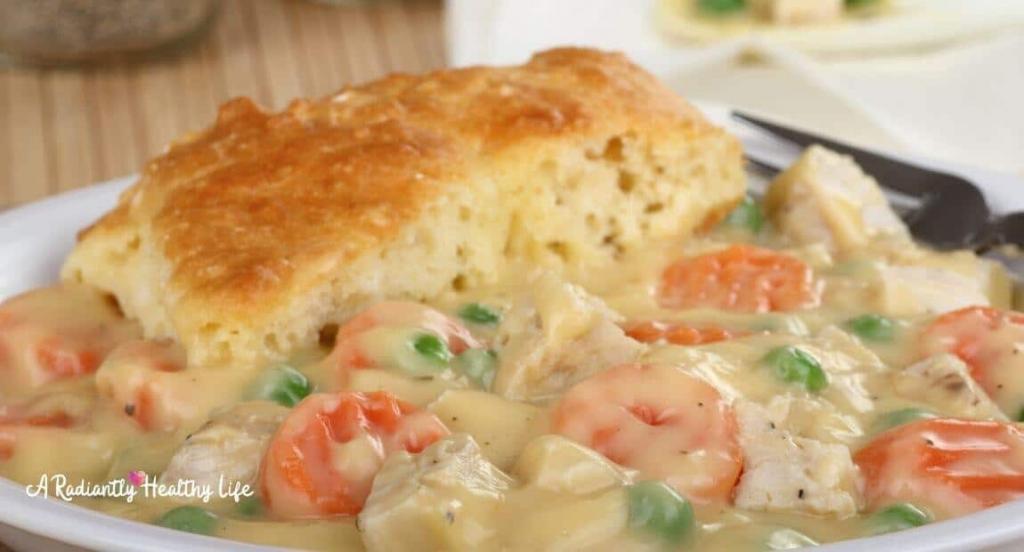
Now that you have your chicken cooked and all of your ingredients ready, the first thing you’re going to do is put the vegetables and the chicken into a casserole dish.
After that, you’ll make the gravy on the stovetop. When that is done, carefully pour the gravy into the casserole dish over the chicken and vegetables. Use a spoon to mix the gravy into the vegetables and chicken. Make sure you cover all ingredients, mix well, and then gently smooth the top.
Then in a large bowl, add the ingredients for the topping and mix well. The topping should be a consistency that is a little thinner than dough.
Finally, pour the topping on the chicken pot pie evenly. Make sure that the crust mixture is spread evenly around the casserole pan.
*If you would rather make an actual pie or have a pie crust you can use the gluten-free pie crust recipe from our homemade apple pie!
Finally, place your gluten-free chicken pot pie into the oven for about 30 minutes, or until the topping is golden brown.
This recipe is perfect for batch cooking because it freezes well and leftovers are just as good (if not better) than the first time you eat it, so be sure to make a double batch!
Other Healthy Recipes You’ll Love!
Printable Homemade Gluten-Free Chicken Pot Pie Recipe

Homemade Gluten-Free Chicken Pot Pie
This homemade, gluten-free chicken pot pie recipe is perfect for those times when you’re wanting something yummy and comforting. It is also free from gluten and dairy. This recipe a healthy twist on the classic pot pie flavors you know and love and is great for batch cooking because it reheats so well. Just be sure to make extra because this will definitely be a new family favorite!
Ingredients
- Ingredients
- 1.5 pounds cooked chicken breasts, diced or shredded
- 1 cup yellow onion, diced
- 2 cups of fresh or frozen mixed vegetables (carrots, beans, peas, corn or your favorites. Broccoli could work too!)
- Gravy Ingredients
- 1 cup of milk, your choice
- 1 cup chicken bone broth
- 2 tsp ghee
- 3 tsp poultry seasoning
- 1 tsp garlic powder
- 1 tsp salt
- 1/2 tsp pepper
- 1.5 tbsp arrowroot flour dissolved in 2 tbsp water
- Topping Ingredients
- 1 1/2 cups of gluten-free all-purpose flour
- 2 Tbsp. ghee
- 1 1/2- 3/4 cup of water or milk of choice (measurement depends on how big your casserole dish is and how thick you want your topping)
- 1/2 tsp poultry seasoning
Instructions
- Grease your casserole dish and preheat the oven to 350 degrees.
- Add the cooked chicken and chosen vegetables into the dish.
- In a saucepot, add all of the sauce ingredients except for the arrowroot dissolved in water. Bring to a simmer. Be sure to stir frequently!
- Dissolve the arrowroot into 1 tbsp of water in a cup or small dish. Once the sauce has cooked down a bit after simmering about 10 minutes, pour the arrowroot water into the sauce and stir. It will begin thickening.
- Once the sauce has thickened, pour it over the chicken and vegetable in the casserole dish. Use a spoon to mix the gravy into the vegetables and chicken. Make sure you cover all ingredients, mix well, and then gently smooth the top.
- Next, in a large bowl, add all of the topping ingredients. The topping should be a consistency that is a little thinner than dough.
- Pour topping on the chicken pot pie evenly. Make sure that the crust mixture is spread evenly around the casserole pan.
- Place your gluten-free chicken pot pie into the oven for about 30-40 minutes, or until the topping is golden brown.
This recipe is perfect for batch cooking because it freezes well and leftovers are just as good (if not better) than the first time you eat it, so be sure to make a double batch!